
What is? Dhcp Server In-Networking

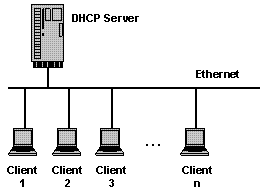
 A DHCP (Dynamic Host Configuration Protocol) server is a network service that automatically assigns IP addresses and other related network configuration parameters to devices on a network. It simplifies the process of network configuration by dynamically allocating IP addresses to devices as they connect to the network.


PLAN the IP Address Range and Exclusions

Besides degerming how to places the DHCP server into the network  structure, you also to plan the ip address ranges you" ii use as well as which ip addresses to reserve or exclude from this pool of addresses. use the following list to help plan the IP address ranges to use and exclude.

.Determine the range of ip addresses that the DHCP server will manage. Most likely, this will be private address range such as 10.x.x.x or 192.168.x.x, or a site-local addresses such as FEC::/10.

.Make a list of any IP addresses to exclude to support hosts with static IP addresses. only DHCP server and hosts that don't' works as DHCP clients need static ip addresses, but DNS server are a good choice for a static IP address as well.

.Make a list off services that need to have unchanging ip addresses, such as DNS and wins server and than decide whether you can use a DHCP reservation or weather bona fide static addresses are needed.

if the dhcp server will be using internet-registered op addresses (which it probably won;t) register the ip addresses with the internet services provider  (isp).

Adding the DHCP Server Role

you can add the DHCP Server Role to any Windows Server 2019 with a fixed ip address. if you re only adding a Dhcp Scop for ipv4 addresses you can use a fixed ipv4 address andan automatically generated link-local ipv6 address, but windows server 2019 will  complain. And we think that complaint is Valid-you really should be using fixed ipv4 and ipv6.

To add the DHCP ROLE to a Windows Server 2019 computer, follow these 

Steps:

       1. Open Server  Manager if it isn, t already open.
     
       2. select roles in the left-hand pane and then select Add Roles from the Action menu to open the Add Roles wizard.

 3. Click Next to open the select Server Roles page of the Add Roles Wizard, as showman 

 Domain Name System (DNS) integration

It is imperative for DHCP networks also to have DNS integration. DHCP concomitant with DNS integration makes it possible for clients using earlier versions of Windows or clients using other OS than Windows to update their records automatically. 

Active Directory integration

Active Directory integration is another feature of the DHCP standard that enables DHCP servers to be authorized within Active Directory. Active Directory integration helps sieve unauthorized servers and maintain a system of only authorized servers within the network. This way, the administrator will fully control the servers allowed in the network.

 
One disadvantage of this feature is that it works only with Windows 2000 DHCP servers. The implication is that any other version of the DHCP server introduced in the network can escape the Active Directory authorization process. 


Comments

Popular posts from this blog

Microsoft-windows-server-2019 New-Features

 windows server 2019is that latest windows server operating system till date and provides the best windows server  operating system for cloud solutions and provides the best integration with Azure  when compared to windows server 2016. The current version of windows server 2019 improves on the previous windows 2016 version in regards with better performance, improved security. better hyper-convergence and outstanding optimizations for hybrid integration. New Features in windows server 2019 Hybrid cloud option: windows 2019 server support Hybrid Cloud, Both on-premise and cloud solutions work together option. the cloud solution can work simultaneously with the on-premise version. New Features in windows server 2019 Storage Migration Service: storage Migration is a new feature/tool that helps migrate date from the legacy plat from to the new 2019 plat from. storage Migration services supports migrating data all the way from windows server 2023 to windows server 2019. it enables the inv

Crontab in linux- Examples and Command

A cron job in Linux is a time-based job scheduler. It is a utility that allows you to schedule and automate the execution of scripts, commands, or programs at specific intervals or at predetermined times. Cron jobs are commonly used in Linux and other Unix-like operating systems to automate repetitive tasks, such as system maintenance, log rotation, backups, and periodic data processing. The cron service is responsible for running these scheduled tasks. It reads a configuration file called the "crontab" (short for cron table) to determine when and which commands to execute. Each user on a Linux system can have their own crontab file, which lists the cron jobs specific to that user The crontab file uses a specific format to define the schedule of a cron job. It consists of six fields that specify the timing of the job: scss * * * * * command_to_be_executed | | | | | | | | | +----- Day of the Week ( 0 - 7 ) (Sunday = 0 or 7 ) | | | +------- Month ( 1 - 12 ) | | +--

How TO Manage Groups Ad User on linux

Linux Admin - User Managemen When discussing user management, we have three important terms to understand − Users   Groups Permissions We have already discussed in-depth permissions as applied to files and folders. In this chapter, let's discuss about users and groups. CentOS Users In CentOS, there are two types accounts –  System accounts − Used for a daemon or other piece of software .   Interactive accounts − Usually assigned to a user for accessing system resources . The main difference between the two user types is − System accounts are used by daemons to access files and directories. These will usually be disallowed from interactive login via shell or physical console login .. Interactive accounts are used by end-users to access computing resources from either a shell or physical console login. With this basic understanding of users, let's now create a new user for Bob Jones in the Accounting Department. A new user is added with the adduser command. Following

User quota in Linux step by step

  Linux Admin – Quota Management As a Linux administrator, quota management is an important aspect of managing file systems and controlling disk usage by users. Quotas allow you to set limits on the amount of disk space a user or a group can consume. Here's a general guide on how to manage quotas in Linux:                Enabling Quota Management in C Linux is basically a 4 step process – Step 1  − Enable quota management for groups and users in /etc/fstab. Step 2  − Remount the filesystem. Step 3  − Create Quota database and generate disk usage table. Step 4  − Assign quota policies. Enable Quota Management in /etc/fstab First, we want to backup our /etc/fstab filen − [root@localhost ~]#   cp -r /etc/fstab ./ We now have a copy of our  known working  /etc/fstab in the current working directory. We made the following changes in the options section of  /etc/fstab  for the volume or Label to where quotas are to be applied for users and groups. usrquota grpquota  As you can see, we

Why use vSAN in VMware?

 VMware vSAN, which stands for VMware Virtual SAN, is a software-defined storage solution offered by VMware. It is a component of VMware's vSphere virtualization platform and is designed to provide highly scalable, high-performance shared storage for virtual machines (VMs) in a vSphere environment. vSAN allows you to pool together the direct-attached storage devices (such as hard drives or solid-state drives) from multiple servers in a vSphere cluster and create a distributed storage infrastructure. By aggregating the storage resources from these servers, vSAN creates a shared storage pool that can be utilized by VMs running on those servers. Key features and benefits of VMware vSAN include: Hyperconverged Infrastructure (HCI): vSAN is a key component of VMware's HCI solution. It combines compute, storage, and virtualization resources into a single software-defined platform, simplifying data center operations and reducing hardware costs. Highly scalable and elastic : vSAN a

how to install VMware esxi tools in windows server 2019 step by step

To install VMware Tools on a Windows Server 2019 virtual machine running on VMware esxi, you can follow these step-by-step instructions: Start the Windows Server 2019 virtual machine. 2. From the VMware menu, go to VM -> Guest -> Install/Upgrade VMware Tools. This will mount the VMware Tools ISO to the virtual machine 3. Open File Explorer on the Windows Server 2019 virtual machine.  4.  Locate the CD/DVD drive, which should show the VMware Tools disc icon. 5. Right-click the CD/DVD drive and select "Open" or double-click it to open the contents. 6. Run the "setup.exe" file to begin the VMware Tools installation. 7. If prompted by User Account Control (UAC), click "Yes" to allow the installation to proceed. 8. The VMware Tools installation wizard will appear. Click "Next" to proceed. 9.  On the next screen, select the desired installation options. The default options are usually suitable for most installations,